Translucent Textures with Darkness Weather
This is a guide on resolving rendering issues for 'intermediate alpha' (translucent) textures that are used in HeartGold Version or SoulSilver Version games where the header's weather is "Darkness" (i.e. limited visibility until the move Flash is used).
Symptoms
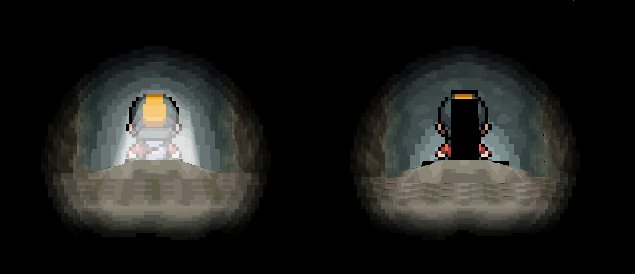
Translucent textures render inconsistently, some polygons render completely opaque and black, others invisible. The below screenshot shows the correctly rendered effect on the left, and the symptom of the issue on the right from the entrance to Dark Cave in HeartGold Version.
Conditions of Issue Occurring
Occurs when the following conditions are met:
- The header's default weather is set to
11(Darkness) or12(Darkness after flash), or the header's weather can be changed to one of these values through scripting or events. - The vanilla or modified Areadata (maps
.nsbtx) contains one or more materials that use either of theA3I5orA5I3colour format values. - A custom map (converted from
.imdto.nsbmdfile either directly, or via map creation in PDSMS) is being loaded that contains one or more faces/polygons using one of these materials.
An example would be a custom map of Cerulean Cave, which has two materials
lightandf_kagethat useA3I5/A5I3colour format, in the light above the cave entrance, and the shadow underneath a bridge.
Root Cause
The material_array section of the .imd file requires translucent materials of this kind of have a specific polygon_id value, in order for the correct transluency attributes to be set in the .nsbmd file. When building maps in PDSMS, it appears that the polygon_id value is always set to 0 by the tool.
A polygon_id value of 8 is required to correctly convert the translucency behaviour for these materials.
This is likely something that is set correctly for all translucent materials wherever they are used in the vanilla games, but there is no visible impact of PDSMS not setting it in most cases.
Understanding the Root Cause
- The g3dcvtr.exe converter that PDSMS uses to produce Nitro System Binary output files (such as
.nsbmdmap files) can also be used to return some information on these files. - By placing an
.nsbmdfile in the same directory as the converter, and then running the converter using a command line utility (e.g. Windows PowerShell), an output file can be returned. - Comparing the outputs of these two files (for example between a vanilla map file and a custom recreation) provides context on specific differences.
- The
PolygonAttrhex value returned provides details on the various parameters within the file for a given material definition.- An outline of these attributes can be found here.
- As can be seen from the above resource, the 24-29th bits of the 32-bit value include information for translucent materials (it is specifically bit 27).
- An easy visualisation of how the hex value relates to specific bits can be obtained by pasting the hex into a tool such as the tomeko binary/hex converter.
- To inform the converter to set this bit correctly during
.nsbmdcreation, apolygon_idof8is required in the.imdfile.
Steps to Resolve
- Export the map to OBJ in PDSMS.
- Convert the map from OBJ to IMD in PDSMS.
- Open the
.imdfile in a text editor (Notepad++ or VScode for example). - Find the translucent material by name in the
material_array. - Replace the associated
polygon_idof0with a value of8. - Save the
.imdfile. - Convert the map from IMD to NSBMD in PDSMS (or by directly dragging the
.imdonto the g3dcvtr.exe converter)
A precise and quick method of completing steps 4 and 5 is to use a find and replace function to find a string of text long enough to be unique to only the materials in question. For example for a material called "light", this string could be searched for: name="light" polygon_id="0" and replaced with this string: name="light" polygon_id="8".