Map Insertion (Generation V)
Author: SpagoAsparago
Research: Gonhex
This is a tutorial on how to insert your own maps in Generation V games, as well as change the Area Data textures. It is assumed you have already made your map in PDSMS (or Blender) and have all the files already converted. If you're unsure how to do so, check Jay's video on creating your first map with PDSMS.
Table of Contents
Replacing Maps
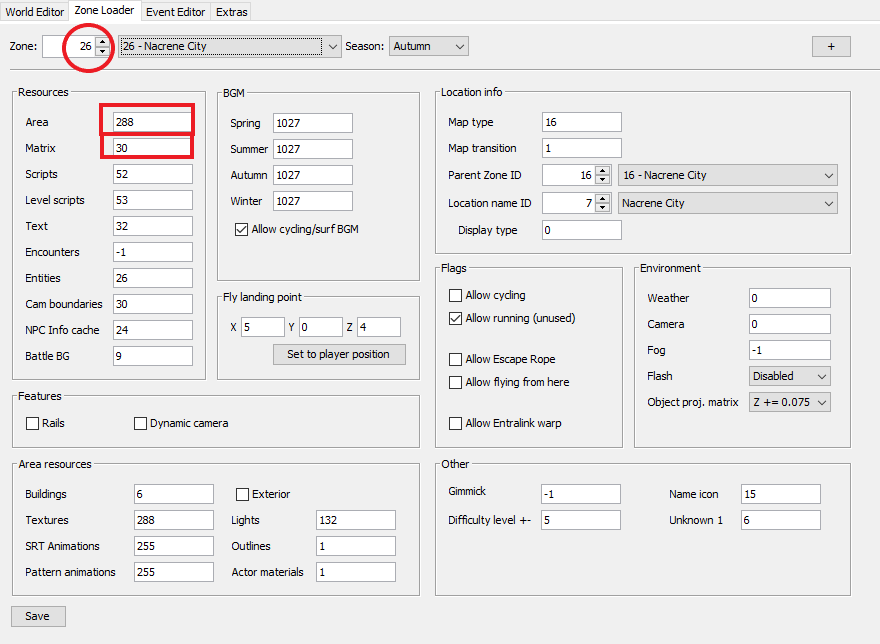
First you need to open CTRMap Zone Loader, and select the map you want to replace. From this window you want to keep in mind:
- The Zone ID (Header Number in SDSME)
- The Matrix
- If your map is using textures not present in the original map, then the Area value as well
Finding the map file
Now you have to find the file number of the map you want to replace, you can do so in two ways:
- Using SDSME:
Only use SDSME for viewing purposes, you shouldn't use it to extract or import files.
Go to the Matrix Editor tab and select your Matrix. Then in the Map Headers tab find out where your Zone ID is located. Open the Map Files tab, and the number you're looking for will be at the same spot of that header in the previous tab. If there is no Map Header tab for the Matrix you've selected, it means all Map Files share the same header.
- Using GFMatrixEditor:
First you have to oepn your ROM with TinkeDSi, navigate the filesystem to /a/0/0/9, and extract the file corrisponding to the matrix number.
Then launch GFMatrixEditor and click the GFMat->Pack button, it will generate two spreadsheet, contaning the Headers and Map files for that matrix. Open the Headers spreadsheet and check where your Zone ID is located, then open the Map Files spreadsheet and at the same spot check what number is there. That's the Map File you're looking for.
Inserting the Map
There are two different programs that can insert the map:
Using BasicPerHandler
In order to use BasicPerHandler you have to first extract the Map Container narc. Load your ROM with Tinke, navigate to /a/0/0/8 in the filesystem, select it and click Extract File, and save the file somewhere.
Then launch BasicPerHandler, click File>Load and select that extracted file. From the list of Map Files, select the one with the number you previously found.
Now all that's left is importing all the files using the buttons below the Matrix view; they are all fairly self-explanatory and you should have all the relevant files from PDSMS.
Remember to also click the Remove button on the Building Table section, unless for the map you're inserting you wish to keep the original buildings (if there are any).
After you're done, click the save button and save the new map container narc. Follow the steps you used to extract it but instead of Extract File click Change File instead, then save your ROM.
Using SwissArmyKnife
If you've never used SwissArmyKnife, before launching the program you will have to go to the SwissArmyKnife folder and create a new folder called BaseROMs, and in there put a fresh copy of the ROM you're editing. By default, it must be named Black/White/Black 2/White 2. However, you can edit the BaseROMs.yml in the SwissArmyKnife folder, and change the path as needed.
Now, you can launch SwissArmyKnife and create a new project.
Go to the Map Editor tab and from the Container Index menu select the Map File number you previously found. Then it's just a matter of importing the relevant files:
- Map Model is the .NSBMD file
- Permissions is the .per file
- At Building Positions click the remove button if possible, unless you wish to keep the original map buildings.
After you're done, save the ROM.
Updating the Area Data
Now your map is inserted into the game, but it will still have its old textures used, meaning if you're using different textures than the map you're replacing, they will have a lot of white spots, so you have to replace the old texture set used with your own that you exported from PDSMS.
Open your ROM in Tinke, then go to /a/0/1/4 and unpack it. You will see a list of files named 4_number.BTX0, go to the file with the same number as the Area value in CTRMap Header, select it and click Change File, and replace it with your own NSBTX.
Keep in mind that if the map you replaced has different textures based on seasons, the next 3 files in the narc will be used as well. So for example if your Area Data number listed in CTRMap is 182, you will have to replace files 182, 183, 184 and 185 as well.
Remember to pack the narc before saving the ROM!
Go back to /a/0/1/4 and click the Pack button. There is no visual confirmation of this in Tinke.