Adding New Overworlds in HeartGold Engine
Author: Senate
This guide will help you to add new overworlds in HeartGold Engine (HGE).
WARNING: HGE will continue to add more overworlds and more overworld graphics -- if you merge these into your project, make sure to update the GFX number that your overworlds start with (more on that later in the guide).
Table of Contents
- Acknowledgements
- Prerequisites
- BTX0 File Overview
- Practically Editing Files for the BTX0
- Expanding the Overworld Table
- Advanced Editing
Acknowledgements
BluRose: All the help in teaching me this and making this possible in HGE.
Prerequisites
- Cloned HGE repository -- refer to the setup guide
- Sprite editing software, e.g. Aseprite and something to index the sprite with, most easily Irfanview
- DSPRE
BTX0 File Overview
HG-Engine (HGE) recently added the ability to construct all of the BTX0 files directly from files in a manner that matches 1:1 with the vanilla overworlds.
As a result, all of the vanilla NPC's and files are dumped to HGE's data/graphics/overworlds folder. This allows for easy editing and expansion.
The BTX0 file format specifies a number of frames that pull from an overall texture at the end of the file. There are also palettes specified for these images to take, making the BTX0 be a sort of all-in-one container for animated palettes that combines NCGR, NCLR, and somewhat flipbook animation files. We dump these to editable formats, specifically a JSON for metadata, a png for the entire texture, and a series of JASC-PAL files as stipulated in the metadata. The PNG is 4bpp (16 colors) and is enforced as such. Most sprites are fine with one JASC-PAL file, and there is one that is prefixed with the same number as the png and JSON files. Following Pokémon have two palettes (and a few others do as well)--an additional one for the shiny palette. The image must be indexed to both palettes--this is to say that the order of the colors must be the same. The best program in my opinion to reconcile palette data with the image and converting images to the proper format is Irfanview.
Practically Editing Files for the BTX0
The easiest way to edit a BTX0 for a new overworld is to replace its image and export the palette over the JASC-PAL that is has already, leaving the name and such similar. The JSON that stores the metadata need not be edited at all and can be copied to a new entry just fine, copying it and renaming to a different number (as well as the PNG texture and the palette file associated with the JSON).
You do not necessarily need to edit the JSON ever--I do not necessarily think there is a reason to. Just copy it, rename it, move it to a subfolder--this tutorial's will be named berries located at data/graphics/overworlds/berries. Just remember this for later when we are editing narcs.mk.
Expanding The Overworld Table
At the top of src/field/overworld_table.c with the definitions for shadows, include the following code:
#define NEW_NPC_START 7000
#define NEW_NPC_GFX_START 2000 // exact number may depend--it is the number of the first overworld gfx that is not used in the overworld table
#define NEW_NPC_ENTRY(num) {.tag = NEW_NPC_START + num, .gfx = NEW_NPC_GFX_START + num, .callback_params = 0}
You can choose what NEW_NPC_START is defined as, but choose an arbitrarily large number that HGE will likely not reach. This ensures that your overworld entry will not be shifted later in your project, which would make for an extremely tedious process of updating your overworlds in DSPRE.
Notably, it should not be higher than 8192. For most purposes, a solid 7000 will suffice.
As mentioned at the beginning of this guide, you will have to change NEW_NPC_GFX_START as HGE adds more overworld sprites. At the time of writing this guide, 1457 is the last used GFX, which belongs to the three segment form of Dudunsparce. Make sure you pay attention to what the last number used by HGE is as you merge!
After the Pokémon overworlds, include the following:
NEW_NPC_ENTRY(0), // the name of your sprite for easy reference
NEW_NPC_ENTRY(1), // another easy name to remember when you're putting things in dspre
So that it will look like:
(...)
{ .tag = 1789, .gfx =  297, .callback_params = OVERWORLD_SIZE_SMALL}, // SPECIES_IRON_BOULDER
{ .tag = 1790, .gfx =  297, .callback_params = OVERWORLD_SIZE_SMALL}, // SPECIES_IRON_CROWN
{ .tag = 1791, .gfx =  297, .callback_params = OVERWORLD_SIZE_SMALL}, // SPECIES_TERAPAGOS
{ .tag = 1792, .gfx =  297, .callback_params = OVERWORLD_SIZE_SMALL}, // SPECIES_PECHARUNT

NEW_NPC_ENTRY(0), // red battle girl
NEW_NPC_ENTRY(1), // blue boy
You have now expanded the overworld table to fit those that you have inserted!
Compiling
If you are not adding brand new NPC overworlds after the followers, you may be all set to compile. However, for those who want to pull future hg-engine updates and still have their overworlds intact...
You will need to add the following in narcs.mk near OVERWORLDS_SRCS := $(BUILD)/pokemonow:
Obviously, replace BERRIES with whatever you would like, be it your project name or whatever. I will use BERRIES (and berries in file paths as previously mentioned).
OVERWORLDS_BERRIES_SRCS := $(wildcard $(OVERWORLDS_DEPENDENCIES_DIR)/berries/*.png) $(wildcard $(OVERWORLDS_DEPENDENCIES_DIR)/berries/*.json) $(wildcard $(OVERWORLDS_DEPENDENCIES_DIR)/berries/*.pal)
OVERWORLDS_BERRIES_OBJS := $(patsubst $(OVERWORLDS_DEPENDENCIES_DIR)/berries/%.png,$(OVERWORLDS_DIR)/2_%.btx0,$(OVERWORLDS_BERRIES_SRCS))
Where it says add your own overworld sources, add your own overworld sources:
# add your own overworld sources here
ALL_OVERWORLDS_SRCS := $(OVERWORLDS_SRCS) $(OVERWORLDS_BERRIES_SRCS)
ALL_OVERWORLDS_OBJS := $(OVERWORLDS_OBJS) $(OVERWORLDS_BERRIES_OBJS)
And then add your rules to place your new overworlds after the the ones that already exist sequentially in the narc:
$(OVERWORLDS_DIR)/2_%.btx0:$(OVERWORLDS_DEPENDENCIES_DIR)/berries/%.png $(OVERWORLDS_DEPENDENCIES_DIR)/berries/%.json $(OVERWORLDS_DEPENDENCIES_DIR)/berries/%*.pal
	$(BTX) $< $@
It should end up looking like this:
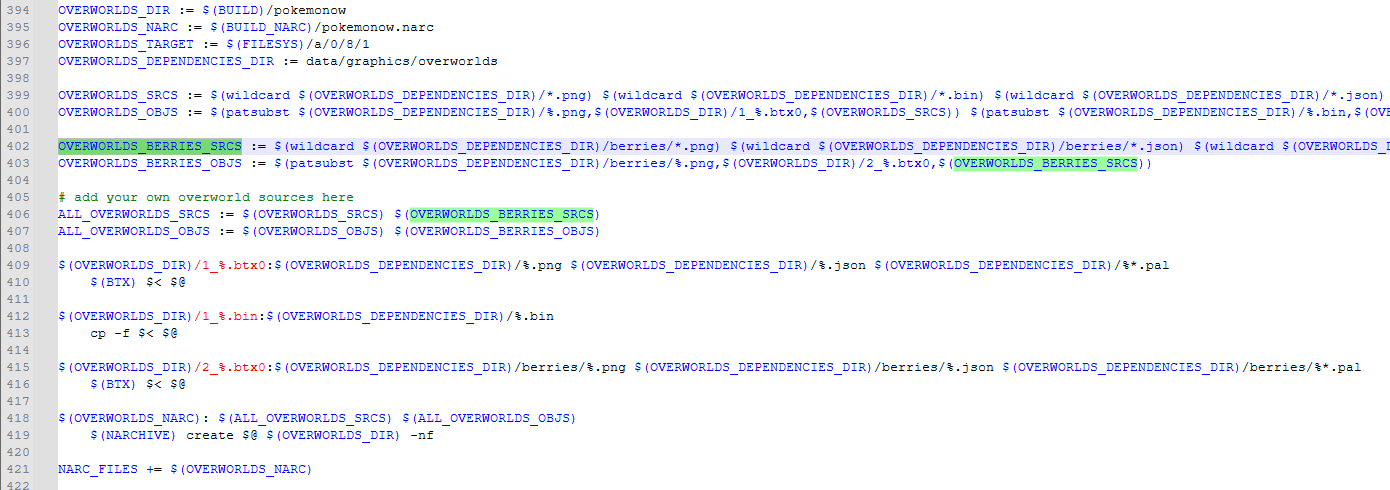
Or a diffed view, showing edited/added lines:
Click to open!
OVERWORLDS_DIR := $(BUILD)/pokemonow
OVERWORLDS_NARC := $(BUILD_NARC)/pokemonow.narc
OVERWORLDS_TARGET := $(FILESYS)/a/0/8/1
OVERWORLDS_DEPENDENCIES_DIR := data/graphics/overworlds

OVERWORLDS_SRCS := $(wildcard $(OVERWORLDS_DEPENDENCIES_DIR)/*.png) $(wildcard $(OVERWORLDS_DEPENDENCIES_DIR)/*.bin) $(wildcard $(OVERWORLDS_DEPENDENCIES_DIR)/*.json) $(wildcard $(OVERWORLDS_DEPENDENCIES_DIR)/*.pal)
OVERWORLDS_OBJS := $(patsubst $(OVERWORLDS_DEPENDENCIES_DIR)/%.png,$(OVERWORLDS_DIR)/1_%.btx0,$(OVERWORLDS_SRCS)) $(patsubst $(OVERWORLDS_DEPENDENCIES_DIR)/%.bin,$(OVERWORLDS_DIR)/1_%.bin,$(OVERWORLDS_SRCS))
+
+OVERWORLDS_BERRIES_SRCS := $(wildcard $(OVERWORLDS_DEPENDENCIES_DIR)/berries/*.png) $(wildcard $(OVERWORLDS_DEPENDENCIES_DIR)/berries/*.json) $(wildcard $(OVERWORLDS_DEPENDENCIES_DIR)/berries/*.pal)
+OVERWORLDS_BERRIES_OBJS := $(patsubst $(OVERWORLDS_DEPENDENCIES_DIR)/berries/%.png,$(OVERWORLDS_DIR)/2_%.btx0,$(OVERWORLDS_BERRIES_SRCS))

# add your own overworld sources here
-ALL_OVERWORLDS_SRCS := $(OVERWORLDS_SRCS)
-ALL_OVERWORLDS_OBJS := $(OVERWORLDS_OBJS)
+ALL_OVERWORLDS_SRCS := $(OVERWORLDS_SRCS) $(OVERWORLDS_BERRIES_SRCS)
+ALL_OVERWORLDS_OBJS := $(OVERWORLDS_OBJS) $(OVERWORLDS_BERRIES_OBJS)

$(OVERWORLDS_DIR)/1_%.btx0:$(OVERWORLDS_DEPENDENCIES_DIR)/%.png $(OVERWORLDS_DEPENDENCIES_DIR)/%.json $(OVERWORLDS_DEPENDENCIES_DIR)/%*.pal
	$(BTX) $< $@

$(OVERWORLDS_DIR)/1_%.bin:$(OVERWORLDS_DEPENDENCIES_DIR)/%.bin
	cp -f $< $@

+$(OVERWORLDS_DIR)/2_%.btx0:$(OVERWORLDS_DEPENDENCIES_DIR)/berries/%.png $(OVERWORLDS_DEPENDENCIES_DIR)/berries/%.json $(OVERWORLDS_DEPENDENCIES_DIR)/berries/%*.pal
+	$(BTX) $< $@

$(OVERWORLDS_NARC): $(ALL_OVERWORLDS_SRCS) $(ALL_OVERWORLDS_OBJS)
	$(NARCHIVE) create $@ $(OVERWORLDS_DIR) -nf

NARC_FILES += $(OVERWORLDS_NARC)
And a quick snapshot of 6 individual overworlds and their files in the data/graphics/overworlds folder:
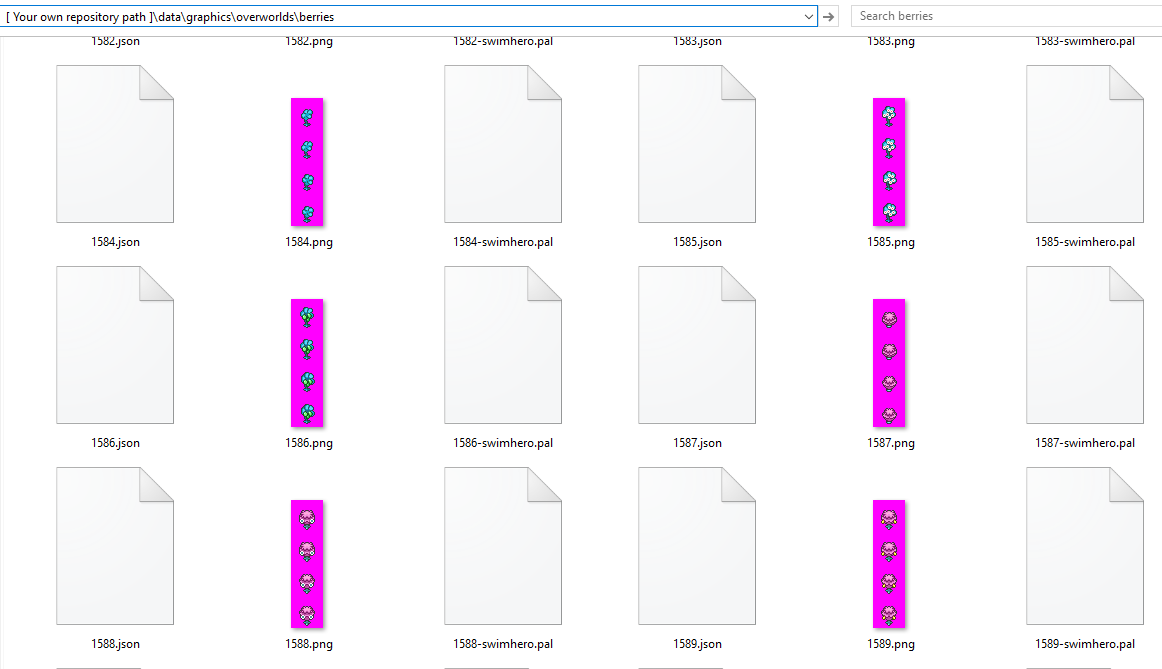
All you should have to do is run make after inserting the new overworlds. You're done!
You can also apply this to porting overworlds from DPPt if you'd like.
Advanced Editing
The JSON metadata file specifies a number of things that are built into the BTX0.
The first section is the frames section. This defines how the continuous texture should be split up to be referenced by the code as parts of an animation.
For all intents and purposes, these should always maintain their current order. The code accesses the frames in the order they are defined, so they must remain the same.
Each frame is located under the overall frames section by its own name. We can take a look at Hitmonlee's follower BTX0 to see what is going on:

Click to open!
{
	"frames": {
		"tsure_poke.1": {
			"frame": 0,
			"coordTrans": 0,
			"color0": 1,
			"format": 3,
			"height": 32,
			"width": 32,
			"flipY": 0,
			"flipX": 0,
			"repeatY": 0,
			"repeatX": 0,
			"unkBlockUnk0": 613,
			"unkBlockUnk1": 259,
			"unk0": 0,
			"unk1": 1,
			"unk2": 128
		},
...
Here we see the beginning of 0404.json.
This shows the start of the frames section as well as the entire first frame defined, tsure_poke.1. The text names for both each frame and the palettes (covered later) are limited to 16 characters of ASCII text.
To run through each of the properties:
framedefines which index frame this entry refers to. This is actually used in conjunction with thewidthand theheightto determine the offset within the texture at which this frame starts referring to.coordTransdefines whether the coordinate system should be transformed to some other type. This should always be 0 for our overworlds. See relevant Tinke code for more information.color0determines whether or not the first color in the palette is transparent. A value of1will treat the first color as transparent,0otherwise.formatneeds to be3to signify that the texture format is 4bpp, limited to 16 colors. See relevant Tinke code for more information.heightis the individual frame height restricted to a power of 2. The converter is set up such that the height and width should be the same.widthis the individual frame width restricted to a power of 2. The converter is set up such that the height and width should be the same.flipYis whether or not the texture on being mapped to too large a surface will flip in the vertical direction or not. This is irrelevant for overworlds, and is 0.flipXis whether or not the texture on being mapped to too large a surface will flip in the horizontal direction or not. This is irrelevant for overworlds, and is 0.repeatYis whether or not the texture on being mapped to too large a surface will repeat across the vertical direction or not. This is irrelevant for overworlds, and is 0.repeatXis whether or not the texture on being mapped to too large a surface will repeat across the horizontal direction or not. This is irrelevant for overworlds, and is 0.- and all of the
unkparameters vary seemingly randomly between overworlds and their individual values don't seem to matter too much.
This then repeats for as many frames as are defined.
Then the palettes section begins. These are similar to the frames: we have some more metadata fields that are defined here.
Pasting the one from a follower:
Click to open!
	"palettes": {
		"tsure_poke0": {
			"offset": 0,
			"unk0": 85,
			"unk1": 2,
			"fileName": "tsure_poke0.pal"
		},
		"tsure_poke1": {
			"offset": 1,
			"unk0": 336,
			"unk1": 258,
			"fileName": "tsure_poke1.pal"
		}
	}
}
This is the end of the Hitmonlee overworld JSON that we started with. Here, each palette has its own JSON entry that has its name in ASCII characters (limit 16 per palette), here tsure_poke0 and tsure_poke1.
- The
offsetis the offset in the palette section that the palette data should be inserted. This is multiplied by the size of each palette (0x20) to get each palette's offset within the data. - The
unkblocks are similarly random values that don't seem to affect the loading of the BTX0. - The
fileNameis the palette file (JASC-PAL format as usable/output by nitrogfx) that is used for the palette data, similar to the png for texture data. The current JSON's number is prepended with a dash to thefileNamefield to get the palette that is accessed:tsure_poke0from0404.jsonwill access0404-tsure_poke0.paland convert it to the format for insertion into the BTX0 (BGR555 per color).
Palettes are interesting in that the offset field is sometimes duplicated between separate palette entries. This is not relevant for NPC's or follower Pokémon, but the apricorn trees in 0251.json feature a few edge cases here:

Click to open!
	"palettes": {
		"bonguri.1_pl": {
			"offset": 0,
			"unk0": 94,
			"unk1": 2,
			"fileName": "bonguri.1_pl.pal"
		},
		"bonguri.2_pl": {
			"offset": 0,
			"unk0": 834,
			"unk1": 773,
			"fileName": "bonguri.1_pl.pal"
		},
		"bonguri.3_pl": {
			"offset": 0,
			"unk0": 321,
			"unk1": 260,
			"fileName": "bonguri.1_pl.pal"
		},
		"bonguri.4_pl": {
			"offset": 0,
			"unk0": 832,
			"unk1": 516,
			"fileName": "bonguri.1_pl.pal"
		},
		"bonguri.5_pl": {
			"offset": 0,
			"unk0": 1601,
			"unk1": 1287,
			"fileName": "bonguri.1_pl.pal"
		},
		"bonguri.6_pl": {
			"offset": 0,
			"unk0": 576,
			"unk1": 1030,
			"fileName": "bonguri.1_pl.pal"
		},
		"bonguri.7_pl": {
			"offset": 0,
			"unk0": 1344,
			"unk1": 1543,
			"fileName": "bonguri.1_pl.pal"
		}
	}
}
Every single offset is 0. Every fileName is the same. This is to reflect that every palette actually pulls from the same file and refers to the same palette, essentially.
This is reflected in the NPC frames as well. Particularly relevant is the female protagonist, 0070.json:

Click to open!
{
	"frames": {
		"heroine.1": {
			"frame": 0,
...
		},
		"heroine.10": {
			"frame": 1,
...
		},
		"heroine.11": {
			"frame": 2,
...
		},
		"heroine.12": {
			"frame": 3,
...
		},
		"heroine.13": {
			"frame": 4,
...
		},
		"heroine.14": {
			"frame": 5,
...
		},
		"heroine.15": {
			"frame": 4,
...
		},
		"heroine.16": {
			"frame": 6,
...
		},
		"heroine.17": {
			"frame": 7,
...
		},
		"heroine.18": {
			"frame": 8,
...
		},
		"heroine.19": {
			"frame": 7,
...
		},
		"heroine.2": {
			"frame": 9,
...
		},
		"heroine.20": {
			"frame": 10,
...
		},
		"heroine.21": {
			"frame": 11,
...
		},
		"heroine.22": {
			"frame": 12,
...
		},
		"heroine.23": {
			"frame": 11,
...
		},
		"heroine.24": {
			"frame": 13,
...
		},
		"heroine.25": {
			"frame": 14,
...
		},
		"heroine.26": {
			"frame": 15,
...
		},
		"heroine.27": {
			"frame": 14,
...
		},
		"heroine.28": {
			"frame": 16,
...
		},
		"heroine.29": {
			"frame": 17,
...
		},
		"heroine.3": {
			"frame": 0,
...
		},
		"heroine.30": {
			"frame": 18,
...
		},
		"heroine.31": {
			"frame": 17,
...
		},
		"heroine.32": {
			"frame": 19,
...
		},
		"heroine.4": {
			"frame": 20,
...
		},
		"heroine.5": {
			"frame": 21,
...
		},
		"heroine.6": {
			"frame": 22,
...
		},
		"heroine.7": {
			"frame": 21,
...
		},
		"heroine.8": {
			"frame": 23,
...
		},
		"heroine.9": {
			"frame": 2,
...
		}
	},
Here we see that there are 32 frames defined, but only 24 squares to pull from. Many are just duplicated, pulling from the same space in the texture.
If you have any questions, feel free to join the DS Modding Community Discord server and ask there, preferably in an hg-engine related channel.